

All the drills on one page:
Basic Cue Ball Spins:
If you want to see the complete section, click here.
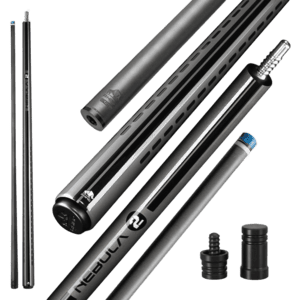
Recomendación de Xavi
El taco que parece que costó el triple
Cuando sientas el peso antes de tirar, lo vas a notar ligero, pero con esa firmeza de saber que el tiro va a salir limpio y ya no dudarás de tu golpeo. Los que llevan treinta años tirando con madera prueban este taco una tarde y ya no vuelven al suyo. La primera vez que alguien te pregunta de dónde sacaste ese taco, notas que llevas un rato sin dejar de sonreír.
Stop Shot Drills

The image shows the exact contact point on the cue ball and the correct cue angle.
The cue ball must stop completely after contact.
Pocket the balls in numerical order.
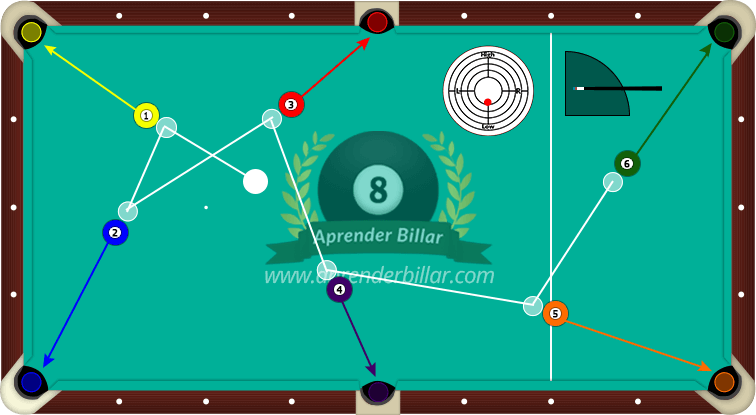
Stop Shot Drill
In this second drill, do exactly the same as in the previous one.
Stun Shot Drills
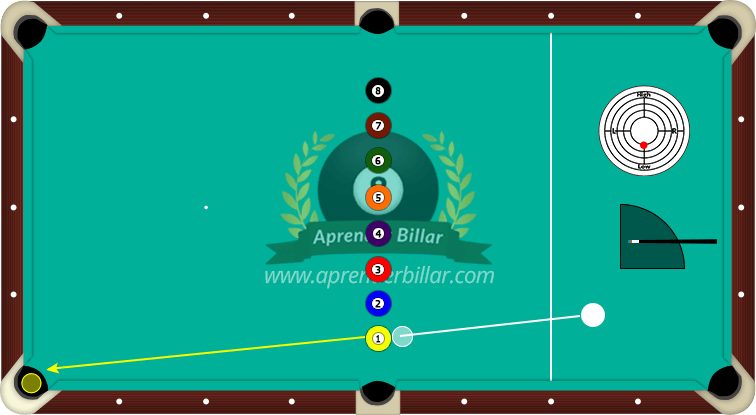
In this drill, the cue ball starts farther away, so you need to aim slightly lower on the cue ball.
This is due to cue ball slide, explained in the spin section.
You must strike that point so the cue ball is in the stun state when it contacts the object ball, making it stop after impact.
After pocketing ball 1, place the cue ball on the same line shown in the image, aligned straight for ball 2, and continue the same way.
Here is Bruce Cheung (@hongcouver.billiards) completing the drill.
Ver esta publicación en Instagram
Follow Shot Drills
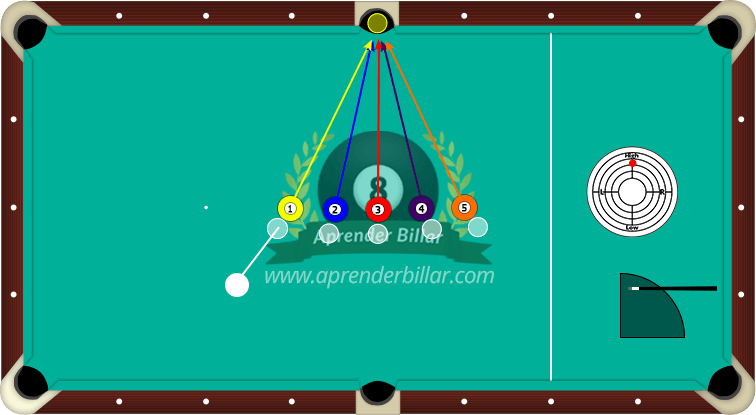
In this drill you’ll practice follow shots exactly as shown in the image.
Pocket ball 1, then continue with ball 2, and so on.

Repeat the same exercise, applying follow spin.
Draw Shot Drills

In this drill you’ll practice draw shots.
Pocket ball 1, then continue with ball 2, and so on.
Keep your cue parallel to the table and chalk your tip before every shot to achieve proper draw.
Watch how Bruce does it—a true example.
Ver esta publicación en Instagram
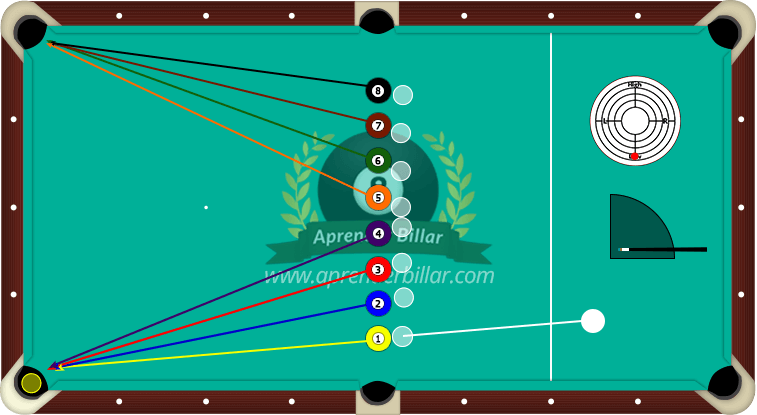
Repeat the same drill, but now the cue ball must cross the kitchen (head string area) for the draw shot to count.
This increases the difficulty.
Drill to Develop Excellent Cueing Accuracy
If you want to see the complete section, click here.
- Perform it without spin.
- Strike the cue ball in the center.
- Send the cue ball between the red balls and hit the corresponding object ball.
- Repeat 50 times or more until you master it.

Side Spin Drills
If you want to see the complete section, click here.

In this drill, pocket all the balls using left english (blue point).
Then repeat using right english (red point).
It’s a challenging drill because side spin makes the cue ball deflect slightly off its original line, causing missed shots.
You’ll need to compensate by adjusting your aim left or right through trial and error.
If you miss, continue from the next available ball.
Break Drills
If you want to see the complete section, click here.

Rack the balls and place the cue ball wherever you prefer.
The objective isn’t necessarily to pocket the 8-ball, since that’s quite difficult.
The real goal is to have the cue ball stop in the center of the table after the break, as shown in the following GIF.

Instagram: @_zerosky
Notice how he hits the head ball and the cue ball comes to a stop.
That’s an ideal break—you can see how well the balls spread.
Now it’s your turn.
Try to leave the cue ball in the center of the table.
Repeat the drill at least five times.

Now it’s time to practice the 9-ball break.
One of the rules of 9-ball is that if you pocket the 9-ball on the break, you win the game.
As shown in the image, this is the break you should practice.
It’s difficult, but not impossible.
Many professionals use this break because it increases their chances of winning.
It also leaves the remaining balls in excellent positions.
Repeat the 9-ball break five times.
Safety Drills

This drill is ideal for learning defensive play.
Place the cue ball behind one cluster of balls and the 1-ball behind another cluster.
Repeat the drill three times and move the balls to different positions each time.
Cushion Shot Drills
There are two important terms you should know.
The Difference Between Bank Shots and Kick Shots

A bank shot is when the cue ball hits the object ball first, and the object ball rebounds off one or more cushions before being pocketed.
A kick shot is when the cue ball hits one or more cushions first before contacting the object ball.
Bank Shot vs. Kick Shot
Now that that’s clear, let’s start the drills.
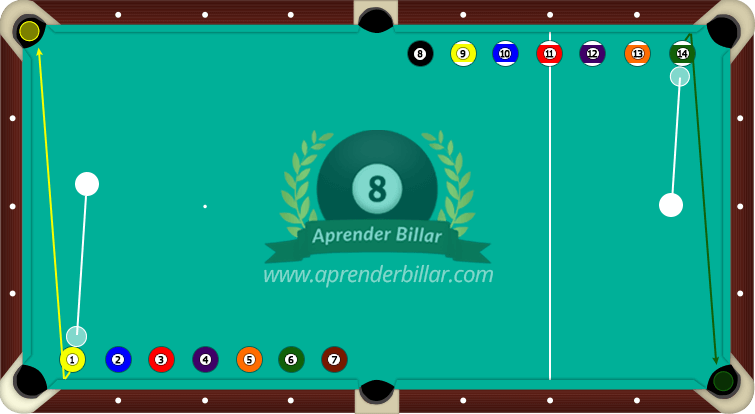
Place the cue ball behind each object ball and pocket it.
Work from the bottom upward.
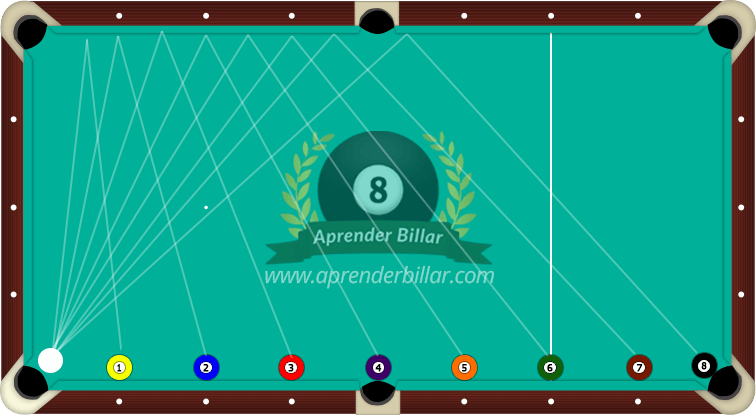
Simply hit the cushion first, then contact ball 1, and continue with the remaining balls.
Cue Ball Control
If you want to see the complete section, click here.
Practice is what really develops cue ball control.
These drills will help you improve significantly.

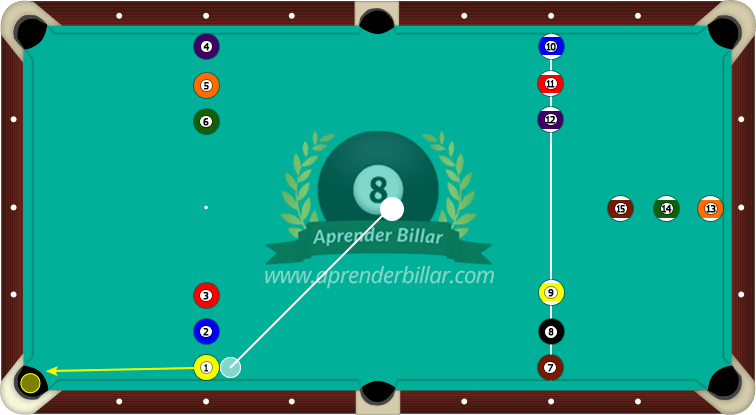
Cue Ball Control Drill
Pocket the balls in numerical order.
Always leave the cue ball in position for the next shot.
Restart if you miss.
Practice three times a week.
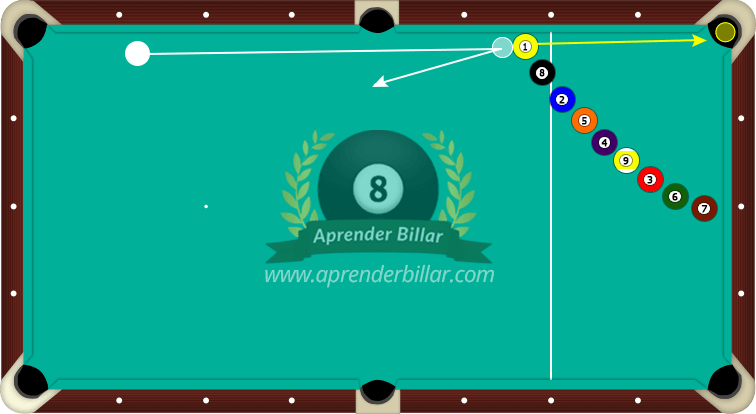
Cue Ball Control Drill
Pocket the balls in order, then repeat without following any order.
Complete the drill without missing.
If you miss, start again.
Practice three times a week.
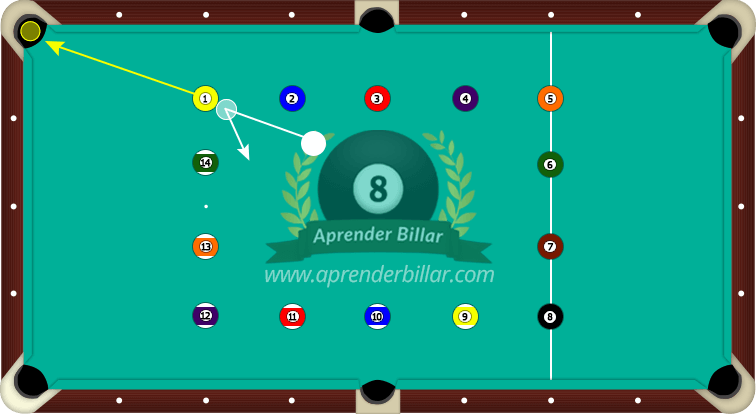
Intermediate Position Play Drill
Pocket all the balls in any order while always positioning the cue ball for the next shot.
If you miss, restart.
Central Rectangle Drill
Pocket every ball without missing.
The cue ball must never leave the center rectangle.
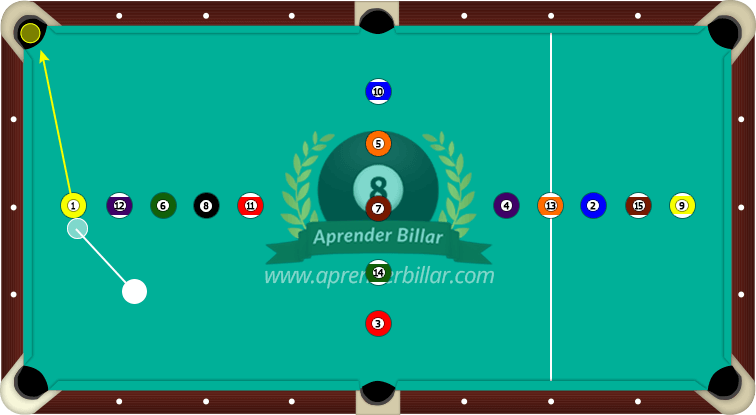
Cross Drill
Pocket every ball without missing or touching any other ball.
Any order is allowed.

Circle Drill
Pocket every ball without missing or touching any other ball.
The cue ball must remain inside the circle.

Z Drill (remove balls 11 and 15 if necessary)
This is the final drill of this level.
Start with ball 1 and pocket every ball in numerical order.
Complete it without missing.

Jump Shot Drills
If you want to see the complete section, click here.
Jump Shot Drill
Now for the fun part.
Place an obstacle ball in front of the cue ball (ball 8 in this example).
Jump over it and pocket each ball along the line.
It doesn’t matter if you miss, and the balls don’t all have to go into the same pocket.
Move the cue ball around while always keeping the obstacle ball in front.

Important: Place a piece of cloth or a protective mat under the cue ball before each shot to avoid damaging the table cloth.
Jump Shot Drill
This second jump drill is easier.
Always begin from the marked square.
Jump the cue ball and pocket every ball in numerical order.
Then increase the difficulty by repeating the drill while pocketing every ball into the same corner pocket, with the cue ball starting outside the square.
Massé Drills

Massé Curve Drill
This drill is slightly easier.
Raise the cue and perform a small massé curve as shown.
Strike the cue ball at the red point (high left) to pocket balls 1 and 3.
Strike at the orange point (high right) to pocket ball 2.
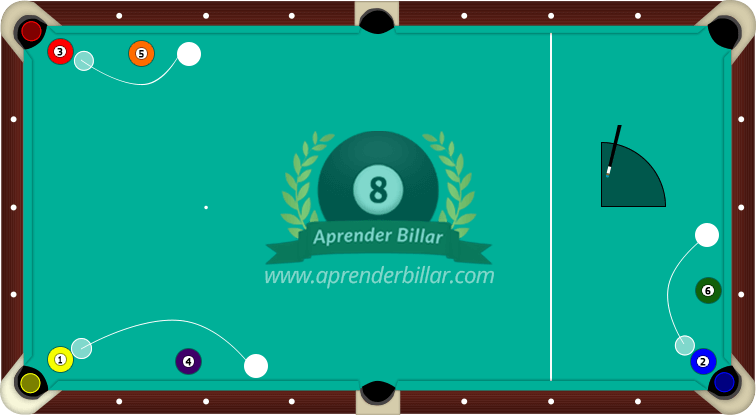
Massé Drill
This drill uses a much larger curve.
If you miss, continue from where you are.
Hopefully you’ve already studied the massé section before attempting this exercise.